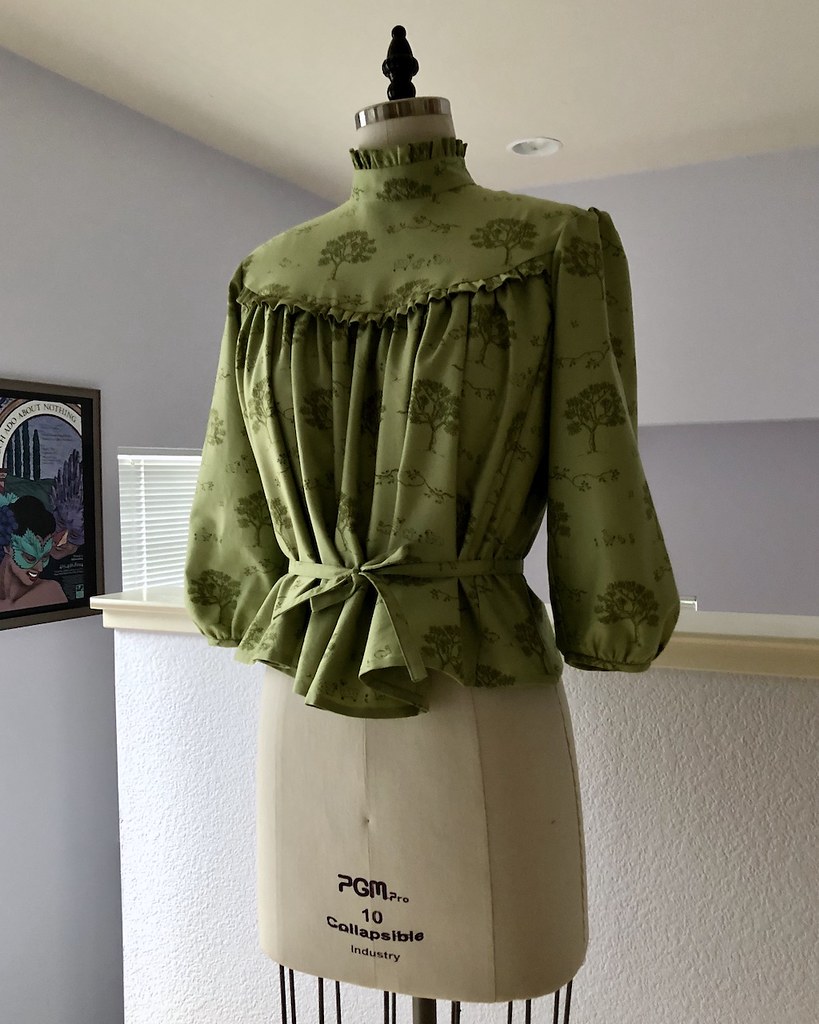
Once I decided to make a Victorian walking skirt, I needed to figure out what to wear with it. In order to embrace my high school obsession with everything Victorian and Edwardian, I decided I should go all out and find an appropriate blouse to pair with the skirt. I had a few reproduction patterns on hand, but I have never worked with Folkwear Patterns before, and now seemed like as good a time as any.
I remember this pattern design vividly. My very first sewing project using a machine was a costume for a theatre class scene from Sense & Sensibility. JoAnn Fabrics used to carry Folkwear Patterns, and I remember my two classmates and I wondering if we should choose the Folkwear Pattern or a McCalls pattern. We had been given strict instructions not to choose something too complicated, so we went with McCalls, but I definitely had my eye on that Empire Dress along with the Edwardian Underthings and this very Gibson Girl Blouse.
I also never realized that the company was local, but there it is, right on the pattern envelope: San Rafael, CA. This probably explains why a local JoAnn Fabrics was carrying the patterns back in the late 90s.
Since I was using Organic Cotton Plus cotton twill for the skirt, it seemed fitting to find an appropriate fabric for the blouse from the same website. After trying to narrow down way too many cute cotton prints, I decided to go with a cotton sateen. I used their cotton sateen to make this dress years ago, and it is really lovely to work with. Already knowing that it drapes very nicely, I though it was a better bet to take than a quilting cotton that might end up a little too stiff for the voluminous blouse pattern.
I went with French seams for most of the construction. I think that using seam binding on a single layer of this fabric was going to be too much, so an enclosed seam was the option I chose.
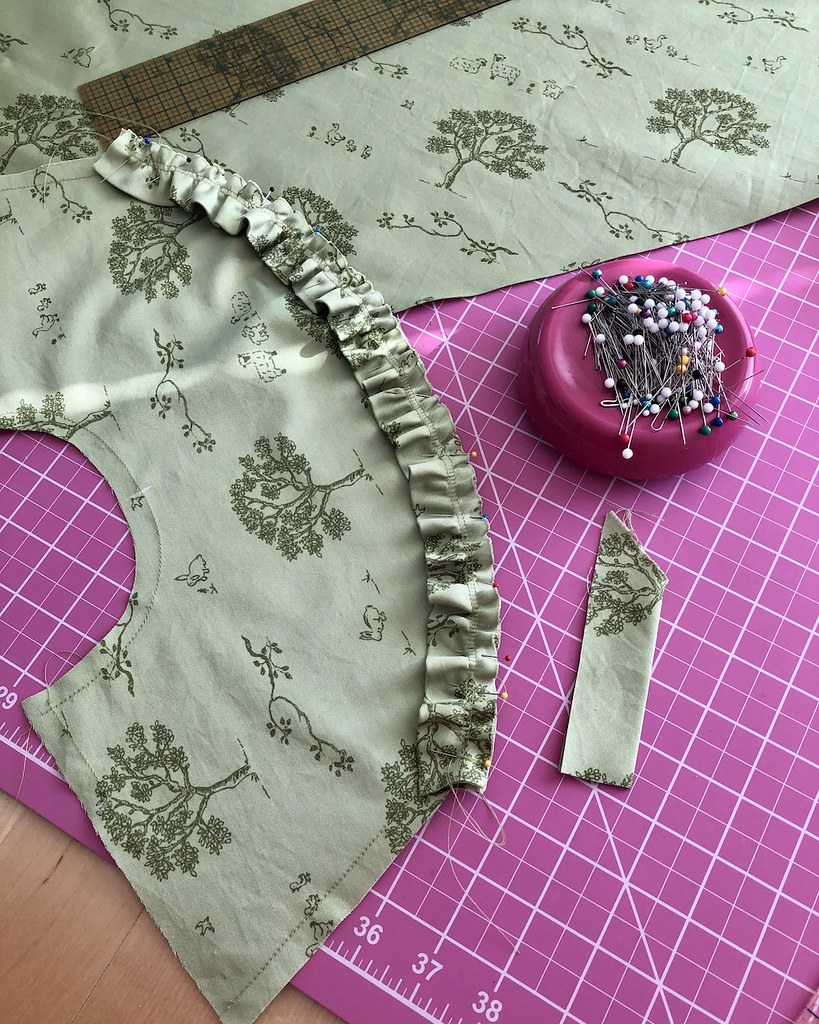
And while I would love to play with lace insertion at some point, this was not the right fabric. There was no way I was going to find a matching lace, at any rate. But I do love the lace details on this design along the yoke and collar. The obvious solution was to make my own ruffle by folding bias strips in half and gathering them.
I ended up cutting each ruffle 1.5X the length of the seam. This seemed like a good proportion, and it turned out well; it's not too much, but the gathers look intentional. I think two times the length would have been too much for this application.
I also added the ruffle along the back yoke. The pattern does not call for any lace at the back, but I always think it looks lazy/cheap not to add an embellishment all the way around a garment unless that portion of the item will never be seen. And let's face it, in the real world, everyone is seen from all angles.
The pattern offers two separate options for the closing at center back. One is buttons and buttonholes; the other is snaps.
Sateen is a glorious fabric, but it does like to fray. Bound buttonholes would not work for this design, and hand worked buttonholes seemed a bit much for a fairly lightweight fabric. I really didn't want to take a chance on machine buttonholes, so snaps and hook & bars it was.
At the more closely fitted areas I like to use a hook & bar. For instance, the neck and at the waist (where the two ties are likely to pull at the back opening) I sewed hooks & bars. I have had issues with snaps popping open at stress points while wearing theatre costumes in the past, and I've never looked back.
But for the blousey areas, snaps are going to stay shut, where a hook & bar needs a bit of tension to remain closed (at least, most of them do). Some of the older hooks that I have come across have a portion of the wire that creates a little hump so that you have to tug it into place, and it will stay put. But for me, in places under no tension, snaps are best, and in places where there will be potential pulling, it's a hook & bar or hook & eye.
There is one other thing to note with this pattern. The blouse is drafted for a very short-waisted individual! I usually add a bit of torso length to my bodice pieces, but even though I added 1/2" to the hemline, this garment still feels very short.
If I make this again (and there's a good chance that I will) I plan to add another 1" at the hemline. And that is more of an adjustment than I have ever made in that area.
The ties are optional, but I think the silhouette created with the definition through the waist really makes this design.
As with the torso length, I should have lowered the placement of the ties. But they are top-stitched in place, and I don't think the sateen would take well to a seam ripper. As it stands, the waistband of my skirt is wide, and I should be able to keep the ties hidden.
While I know that the waistband on the skirt I am going to wear with this blouse would look fine with a tucked-in blouse, I thought that a belt made of the blouse fabric would be a nice finishing touch. I know that Victorian shirtwaists often had matching belts. Whether or not they were stitched together is discussion for another day, but I think that for my purposes, this will work just fine.
I cut one shaped belt piece on the cross grain and then interfaced it for stability. This will be worn over a boned skirt waistband, so I didn't feel the need to bone the belt as well. A second piece was cut 1.5" wider than the first piece and on the bias.
Those two pieces are stitched together along both long edges and turned right side out.
The extra fabric creates a nice bit of texture without looking like a pleated cummerbund or crumb-catcher! When I purchased this buckle on Etsy years ago, I was a little disappointed that the actual item was extremely lightweight and a bit more chintzy looking than I had hoped. But I think that the notion was just waiting for the right project. Thankfully, I keep all of my buckles stashed together in two boxes, so it was easy to find. And I am really thrilled that I added the belt - it really finishes the look. My dress form is a too large for the finished belt, but here is an idea of what the finished item looks like. And now it's ready to be paired back with my new skirt!


French seams, ruffles, cross grain and on the bias...Laura Mae your grasp of a garment's gestalt is gigantic.
ReplyDeleteAwaiting the modeling, and yes I am that one person picketing for you to pose in a different setting. Surely you have a day-trip planned or can kidnap one's own mother for hi-jinx and adventure.
Your readers actually enjoy seeing you and your partner-in-crime brazenly before the camera, flaunting etiquette and flouting convention.
The kindly gent in the second row
PS: Do we get a year-in-review, through the lens of your creations?
The blouse is stunning.
ReplyDelete