Ever since a high school friend showed up to class one day
in her cheerful pumpkin colored sweater, the hue makes me happy. If perhaps it does not make my complexion
quite as happy, so be it.
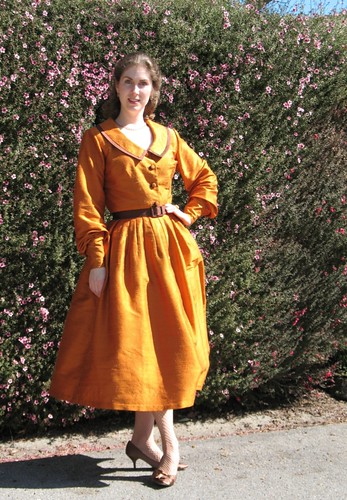
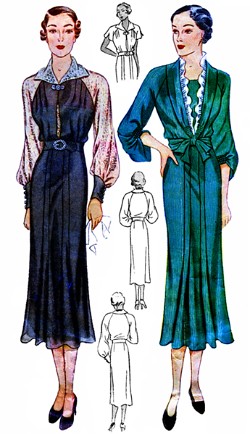
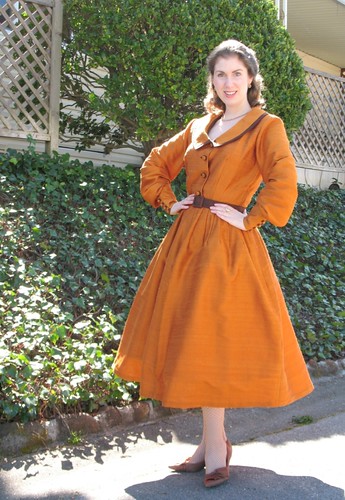
This is, in fact, the second version of this lovely vintage
pattern I have made. The
first was for my Lucy Halloween costume.
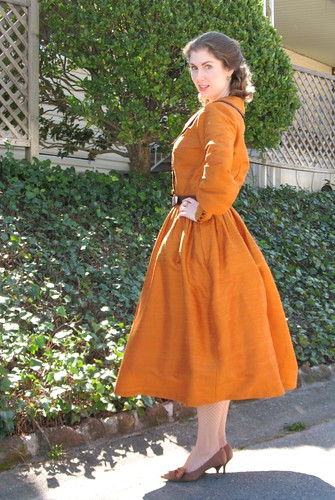
For my second, I decided that a few alterations would be
fun. Also, the first time around, I just gathered the skirt pieces because of time constraints, so I wanted to try the darted skirt look.
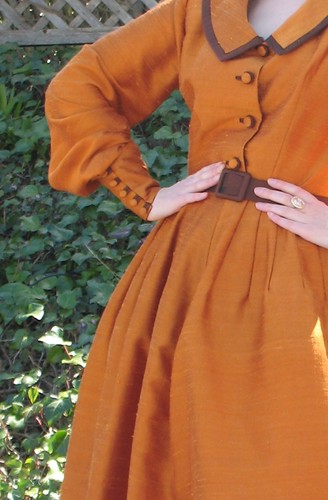
I ditched the pattern sleeves (well, except for the sleeve
head portion) and added the bottom half of this reproduction.
As I have mentioned, I did not quite have enough of my
pumpkin silk dupioni, so my original idea had to be amended. The oversized collar was out. I also knew I would not have enough for a
self-fabric belt, which I had set my heart on.
And a bit of width was taken from bottom edges of the skirt pieces to
squeeze everything in.
I may have abandoned this project altogether if it were not for the
fact that I had finished covering all of those buttons! Silly, I know, but at least the dress is no longer in pieces.
And I think I actually like this color combo more than I
would have liked a solid pumpkin frock!
Dress: Made by me,
Vogue 8433
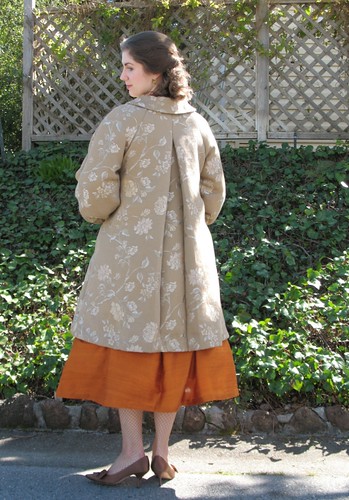
Coat: Made by me,
McCalls 5480
Necklace: Made by me
Earrings: Kate Spade
Shoes: Nina




This dress is so lovely! The sleeves remind me of sleeves on a blouse that Virginia O'Brien wore when she sang "Salome" in Du Barry Was A Lady...only a bit more conservative. :)
ReplyDeleteaaaaaaw what a beautiful dress :D
ReplyDeleteIt's beautiful. I love the effect of those two colors together.
ReplyDeleteThat is an absolutely stunning dress! All of the contrast details are so pretty and I think you look lovely in pumpkin!
ReplyDeleteMay I ask what sort of petticoat, if any, you wore under the skirt? I am trying to figure out what I should be putting under my 50s skirts.
ReplyDeleteI was wearing a petticoat I made myself. One thing to look for it that the gathering begins at the hip line, instead of at the waist - they are so much more flattering! For this particular petticoat, I pushed the excess fabric and netting to the sides, instead of center front and back, which is one of my favorite ways to deal with the extra bulk.
DeleteIt turned out beautifully. I like the alterations/deletions/additions you made to the original pattern. Unless i am mistaken that original pattern is an "unprinted" one, in which case, you deserve giant kudos!
ReplyDeleteIt is an unprinted pattern! As long as the directions are available, they really are not that much more difficult than the modern ones. And a great vintage pattern is always worth the extra effort, in my opinion!
DeleteI love the dress, and I think you are right the brown adds to the dress and makes the pumpkin pop!
ReplyDeleteI actually was not a big fan of pumpkin color until I saw this. It really is a happy color. The fabric is so lustrous I just want to touch it. It seems to have the perfect combination of drape for the sleeves and stiffness for the skirt. Absolutely gorgeous!!! (As usual.)
ReplyDeleteIt's sumptuous! I love the button loops and think the brown belt looks great against the rich orange.
ReplyDeleteI love the color combination- definitely better than all-pumpkin.
ReplyDeleteYes, the brown accents are definitely much more chic that a solid colour would have been, IMOHO. And the colour doesn't look bad on you at all, at least not in these pictures.
ReplyDeleteThis is such a marvelous dress! I think this colour (both colours actually) looks deeply pretty on you. The autumnal tones compliment your blond-light brown locks wonderfully.
ReplyDelete♥ Jessica
It turned out beautiful! And the buttons and loops look magnificent!
ReplyDeleteToo bad about your complexion. ;) I love the color rust, though it doesn't look the best on me... so who cares? It makes me happy.
Brigid
The Middle Sister and Singer
Those cuffs elevate the dress.
ReplyDeleteThe on-point hoisery was a skilled selection.
Congratulations Laura Mae, another success!
Incredible!!!!!! One of my favorite pieces you've made!
ReplyDeleteHOW did you cover those buttons on the front of the bodice? I see two-tone fabric there.
Thanks!
Maria
The buttons are standard covered button forms stitched on top of a plastic ring covered in fabric.
DeleteCasey has an excellent tutorial: http://blog.caseybrowndesigns.com/2010/10/lady-grey-progress/
You can also use a purchased button on top of the fabric covered ring for a different look!
Simply gorgeous! I really like the contrast trim--it adds so much to the dress.
ReplyDeleteThis is stunning! The colour combination is amazing and the cuffss are so elegant.
ReplyDelete